Last updated
Simple Voice Chat
Configure and use Simple Voice Chat on StoneHavenSMP, including proximity chat, voice groups, microphone settings, key bindings, player volumes, and troubleshooting.
This StoneHavenSMP player guide covers how to set up and use Simple Voice Chat so you can talk with nearby members, join voice groups, adjust volumes, and fix common audio problems — all without leaving Minecraft.
Overview
Simple Voice Chat adds voice communication directly inside Minecraft on StoneHavenSMP.
- Nearby players can speak using proximity-based voice chat.
- Voice volume changes based on distance — closer players sound louder.
- Directional audio helps you tell where another player is speaking from.
- Voice groups let you communicate across longer distances when you need a shared channel.
- The mod works inside Minecraft and does not require Discord, Mumble, or another voice application.
- You need the client mod to use voice-chat features.
- Simple Voice Chat is included in the official StoneHavenSMP modpack distributed through the server’s Modrinth share link.
- Members using the official modpack should not normally need to install it separately.
You can still play StoneHavenSMP without speaking. Voice chat is an optional pack feature, and many community moments are better with it enabled when you want it.
First-Time Setup
Complete these steps the first time you use Simple Voice Chat on StoneHavenSMP. Install the shared modpack first if you have not already — see Installing the Modpack.
Join StoneHavenSMP
Connect with the official shared modpack so your client matches the server’s voice-chat expectation.
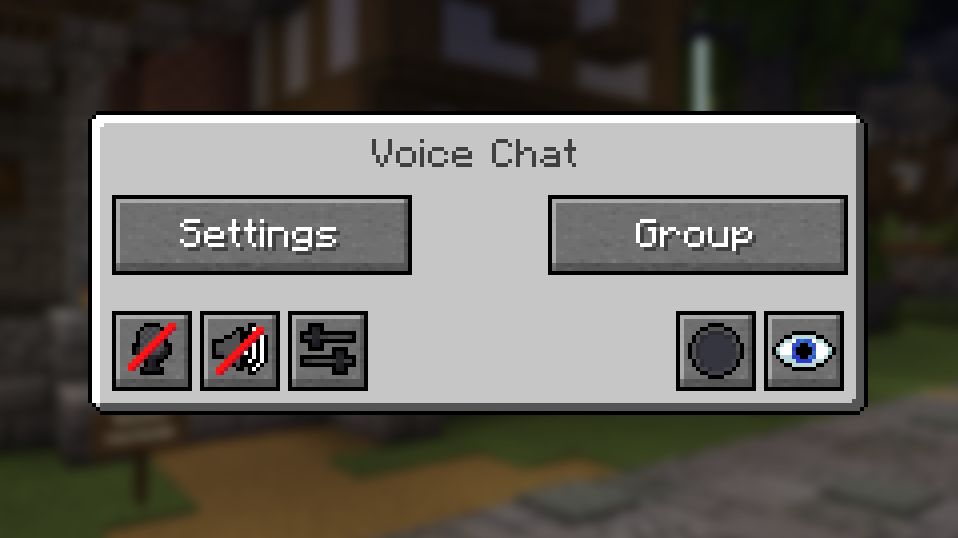
Open the Simple Voice Chat menu
Press
Vto open the main Simple Voice Chat interface.Begin or continue onboarding
Follow the onboarding prompts if they appear, or open settings from the main menu.
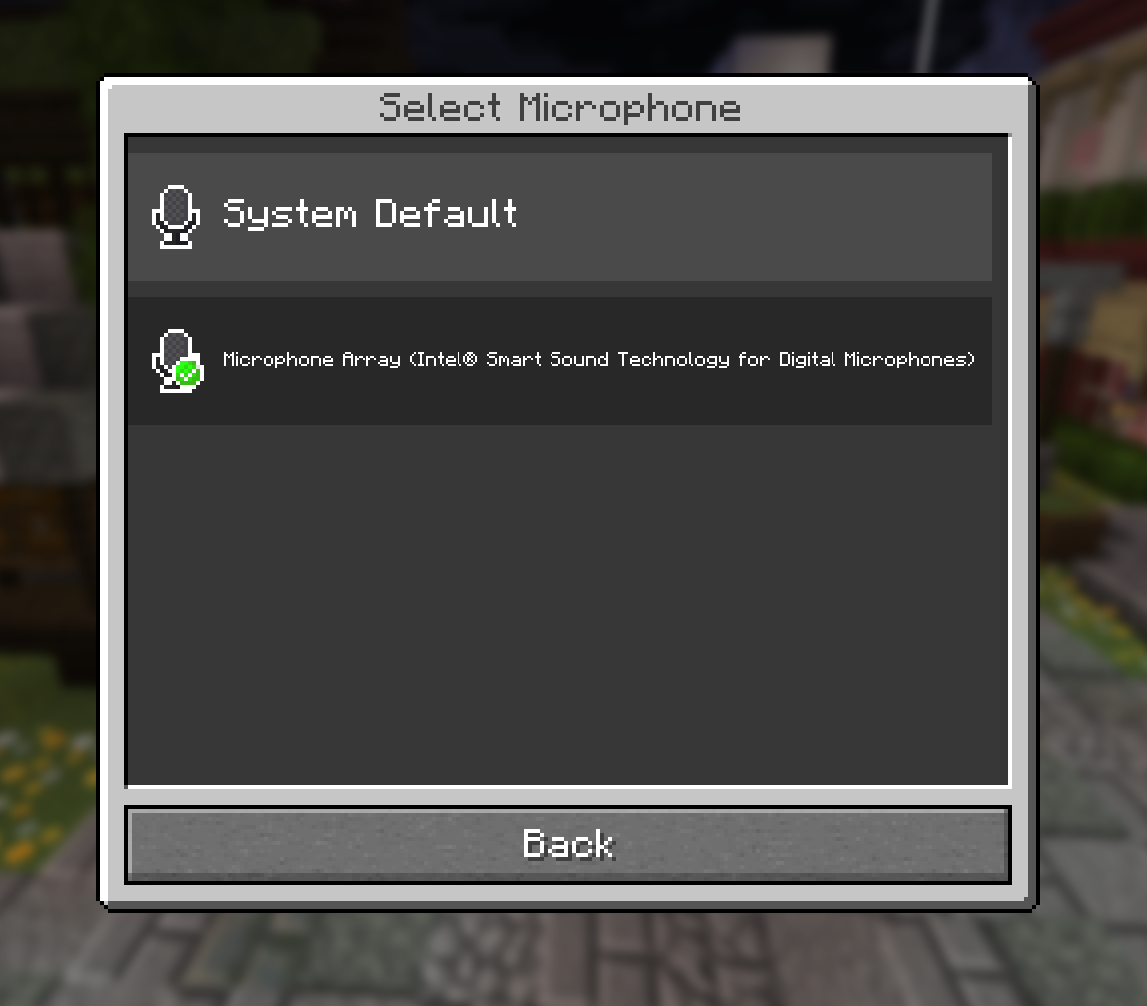
Select the correct microphone
Choose the input device you want to use for speaking.
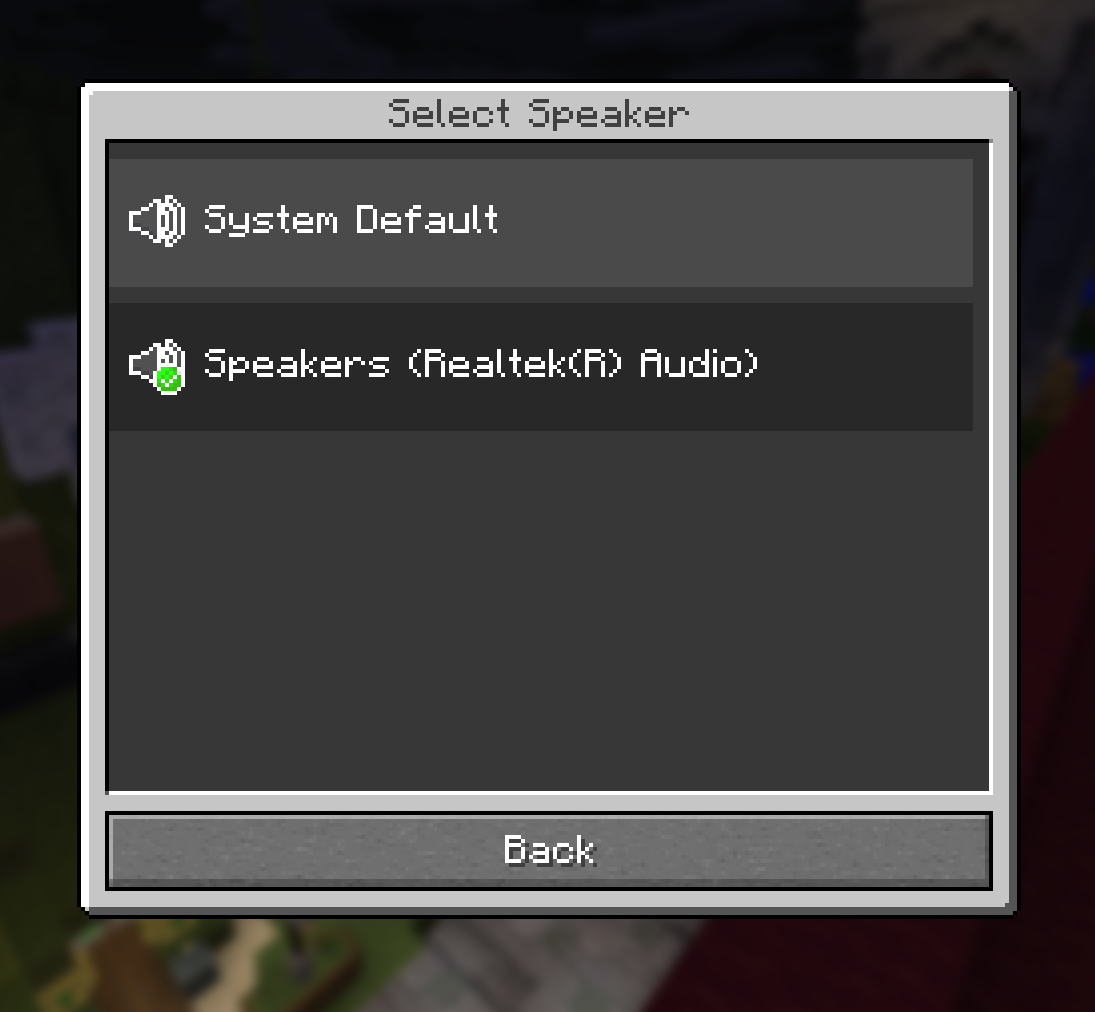
Select the correct speaker or headset
Choose the output device you want to hear other players through.
Choose Push to Talk or Voice Activation
Pick the transmission mode that fits your environment. Push to Talk is the easiest privacy-conscious starting option.
Assign a Push-to-Talk key if needed
If you chose Push to Talk, bind a key you can hold comfortably while playing.
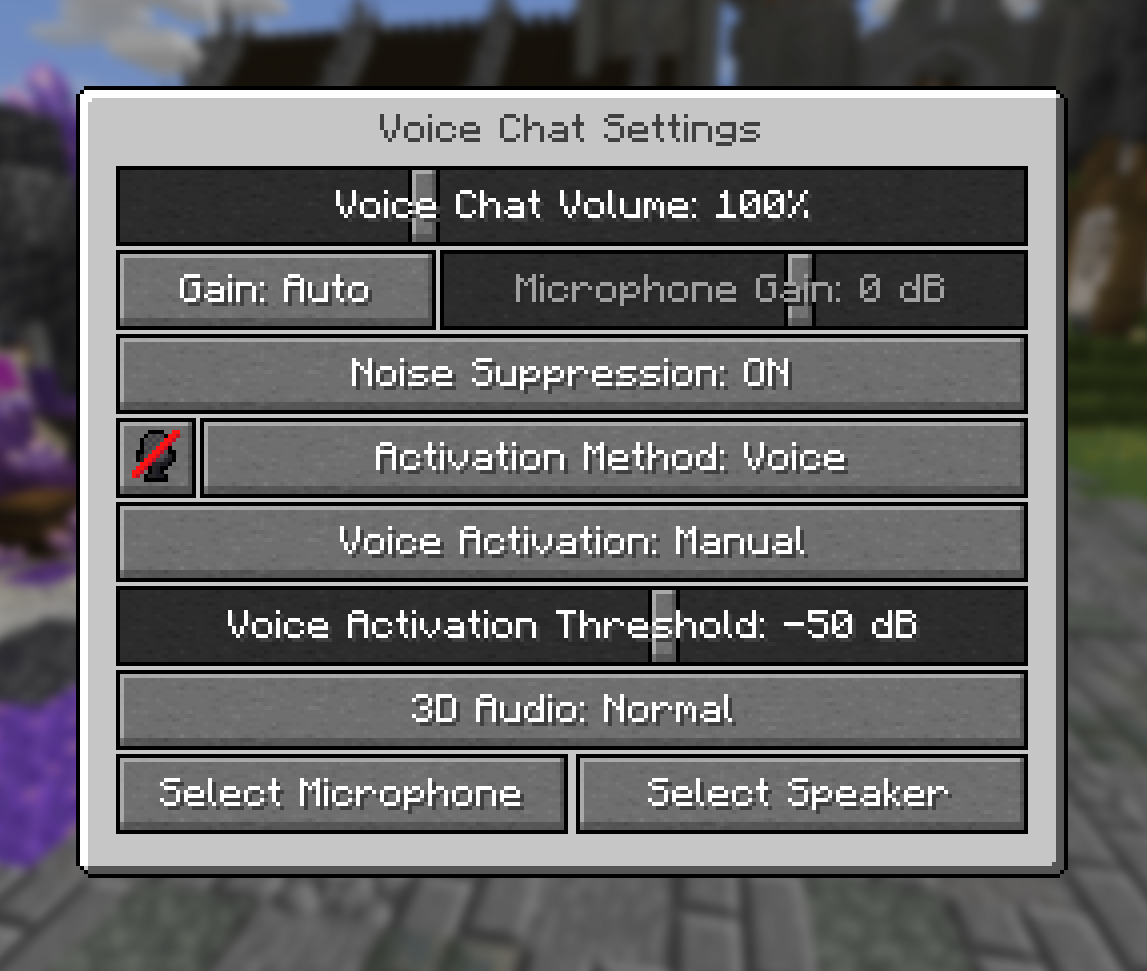
Adjust the Voice Activation threshold if needed
If you chose Voice Activation, set the threshold so normal speech transmits without catching background noise.
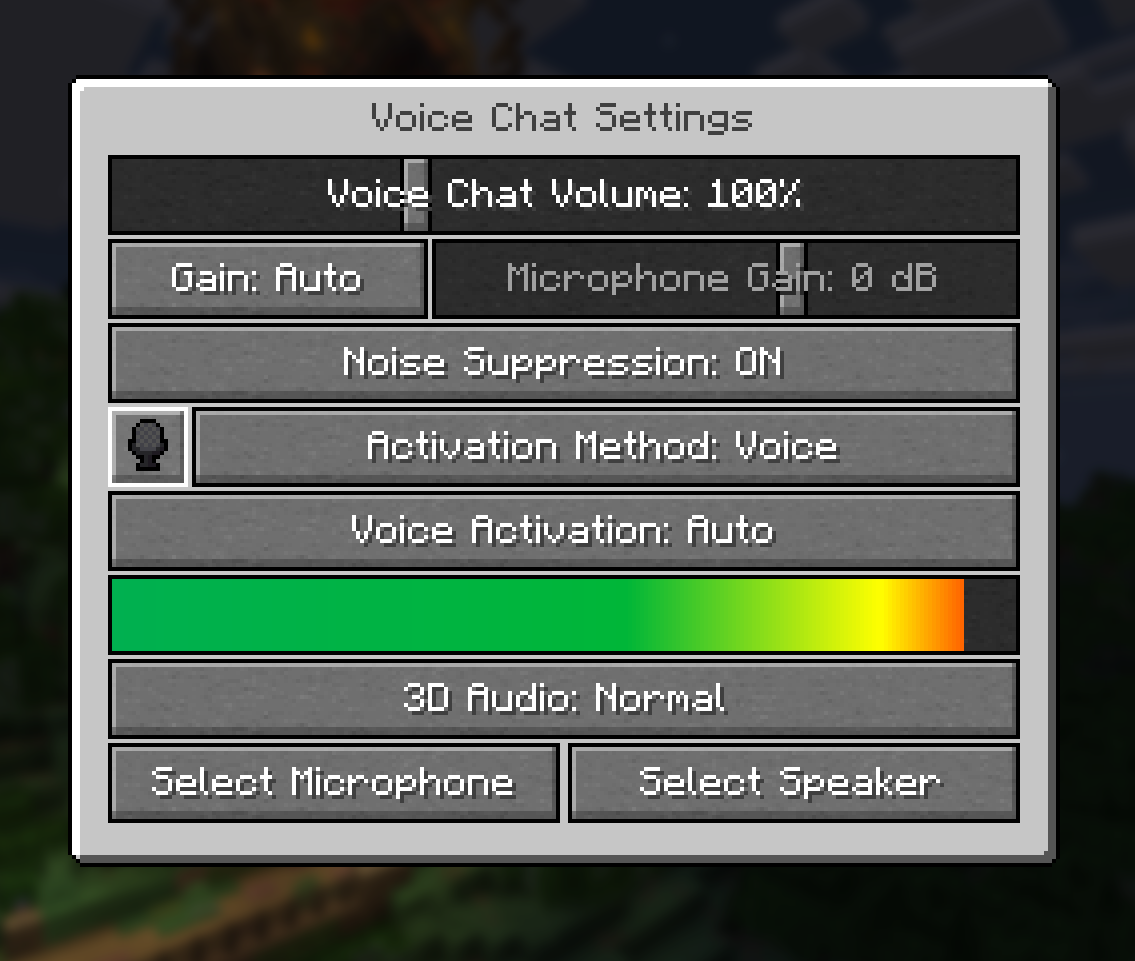
Enable microphone testing
Turn on microphone testing and speak at a normal volume.
Confirm the input meter and test audio
Make sure the input meter reacts to your voice and that the test audio sounds clear.
Save and return to the game
Save your settings, close the menu, and you are ready for proximity voice chat.
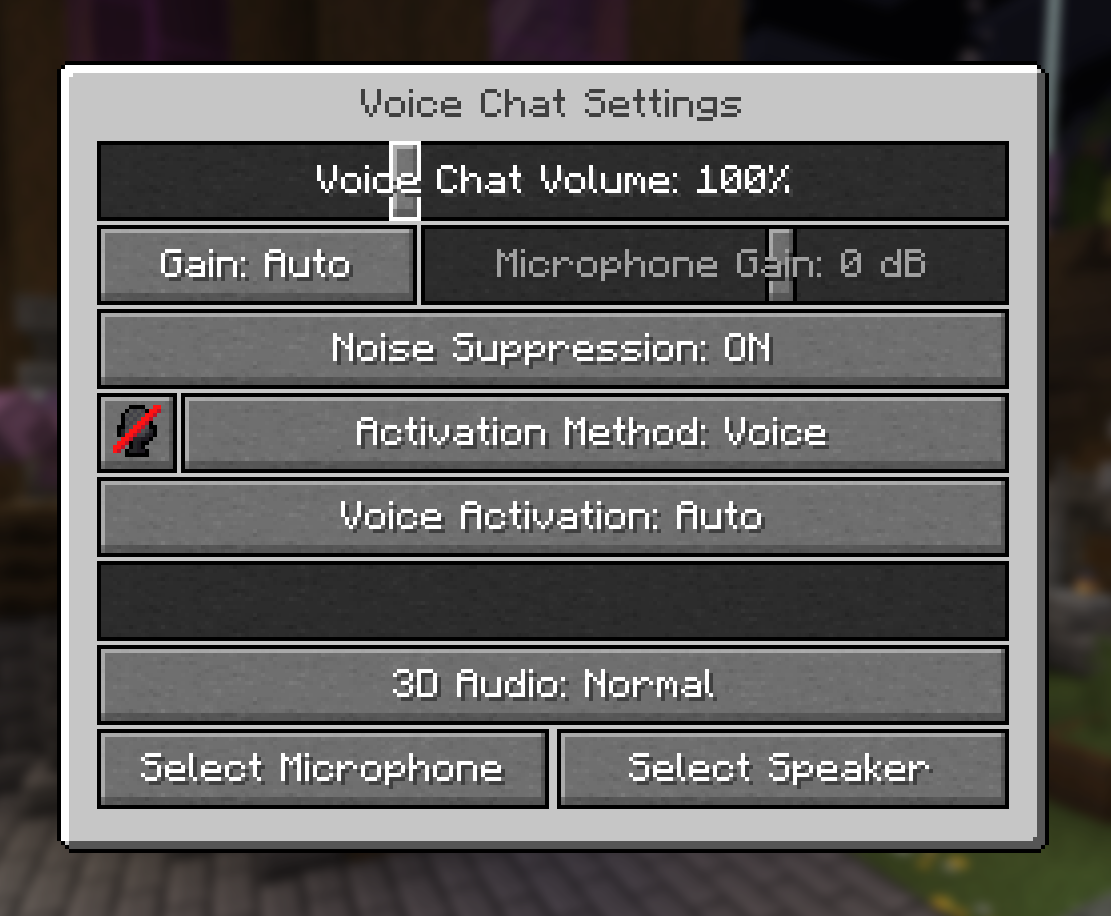
From the main Voice Chat menu, open Settings to reach device selection, activation mode, and other audio options.
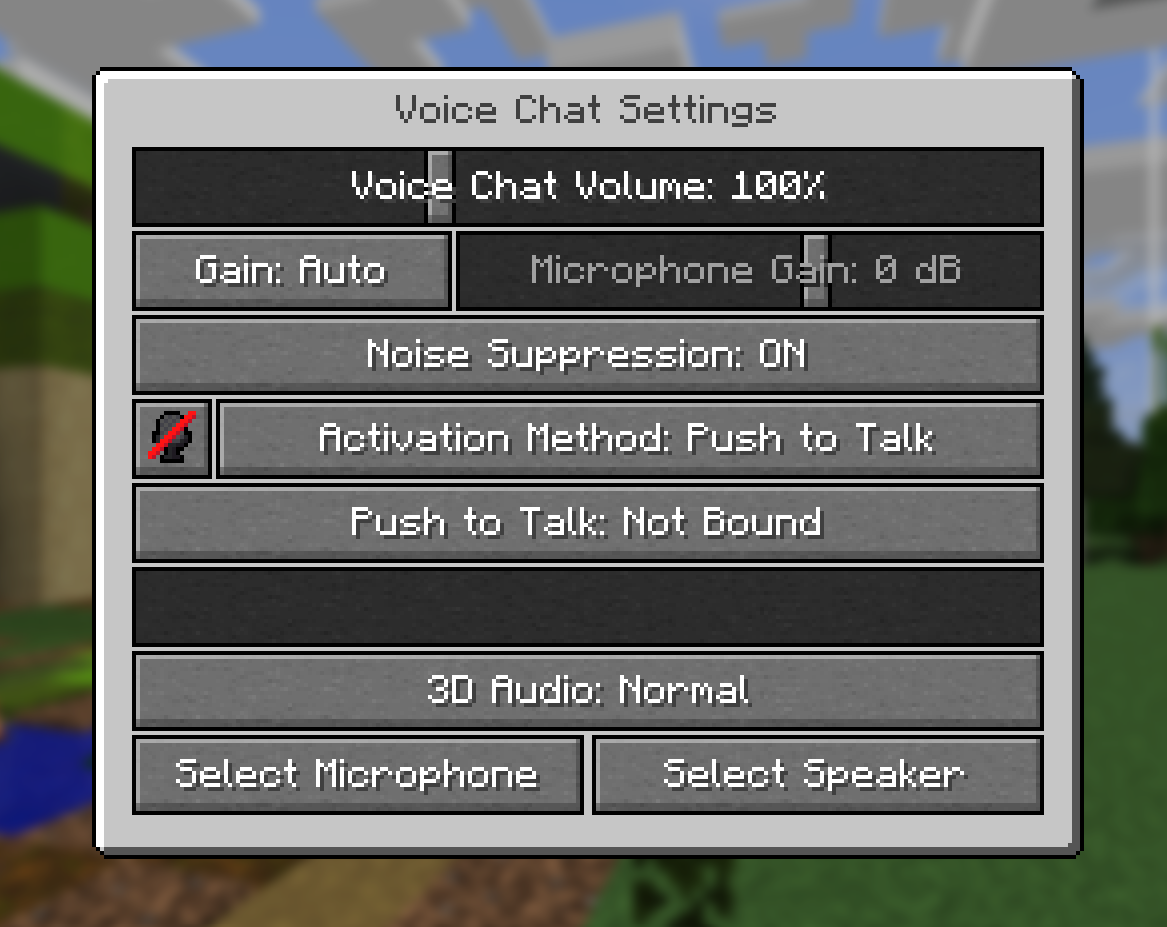
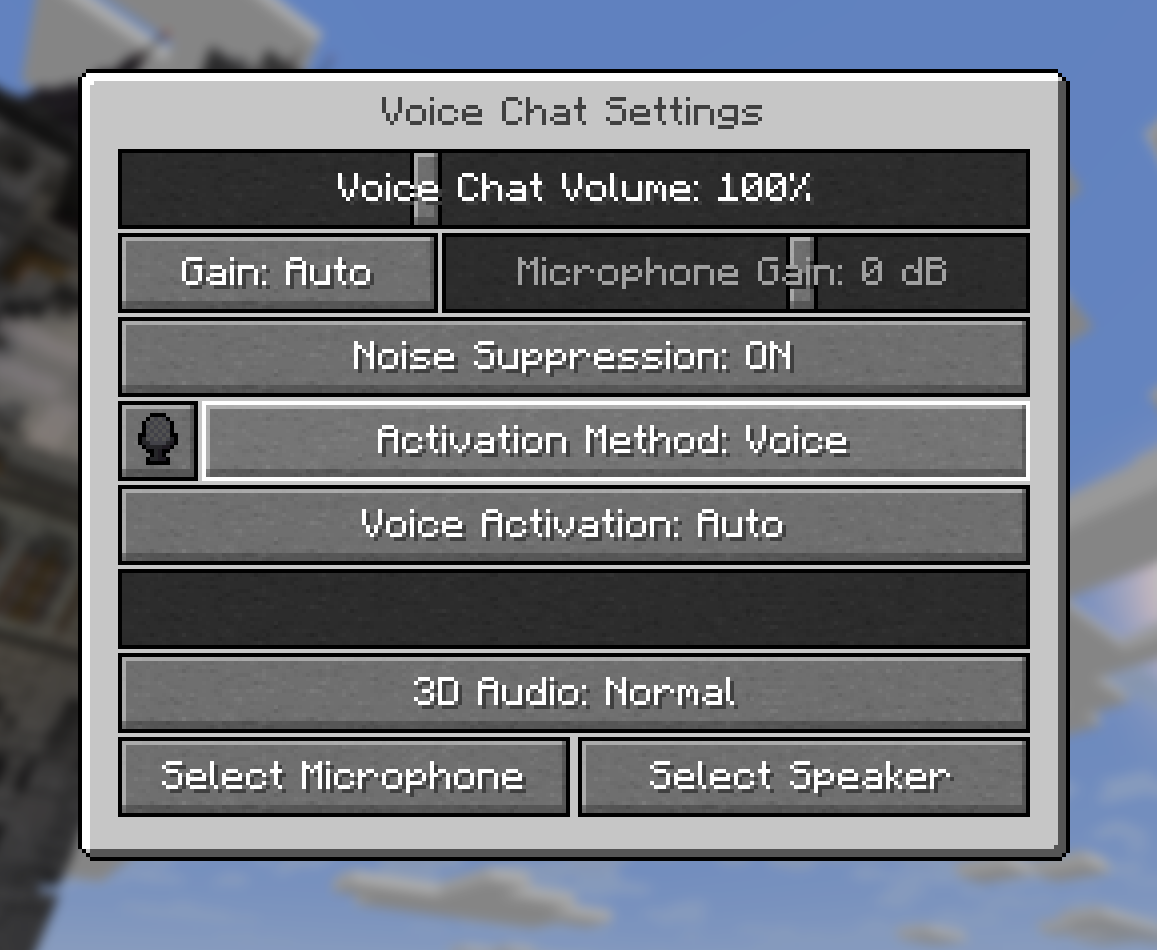
Push to Talk vs. Voice Activation
| Mode | How it works | Recommended for |
|---|---|---|
| Push to Talk | The microphone transmits only while the assigned key is held. | Noisy rooms, shared spaces, and players who want greater control |
| Voice Activation | The microphone begins transmitting automatically when sound exceeds the selected threshold. | Quiet rooms and hands-free conversation |
An improperly configured Voice Activation threshold can transmit keyboards, fans, televisions, pets, or background conversations.
Push to Talk is the easiest privacy-conscious starting option for new users. Either mode is fully supported — choose the one that fits how and where you play.
Change the mode under Activation Method in Voice Chat Settings.
Key Bindings
| Action | Default key | Description |
|---|---|---|
| Open Voice Chat menu | V | Opens the main Simple Voice Chat interface |
| Mute microphone | M | Mutes the microphone while continuing to receive voice audio |
| Disable Voice Chat | N | Disables both sending and receiving voice audio |
| Hide Voice Chat icons | H | Hides voice-chat HUD and player icons |
| Push to Talk | Selected during setup | Transmits while the assigned key is held |
| Group Chats | Unbound by default on newer versions | Opens the voice-group interface |
| Voice Chat Settings | Unbound by default | Opens the settings directly |
| Whisper | Unbound by default | Temporarily transmits using whisper range |
| Toggle Recording | Unbound by default | Starts or stops local voice recording on your client |
All bindings can be changed through Minecraft’s Controls settings.
Defaults can change between mod or Minecraft versions. The in-game Controls menu is authoritative for your installation.
Using Proximity Chat
Normal voice communication on StoneHavenSMP is distance-based:
- Nearby players are easier to hear.
- Voices become quieter as players move farther away.
- Directional audio indicates the speaker’s position.
- Players outside the speaking range cannot hear the conversation.
- Whispering reduces the distance over which you can be heard.
- Entering a voice group changes how group members communicate (see Voice Groups).
On StoneHavenSMP, normal voice can be heard up to 48 blocks, and whisper range is 24 blocks. Staff may adjust these values over time if server settings change.
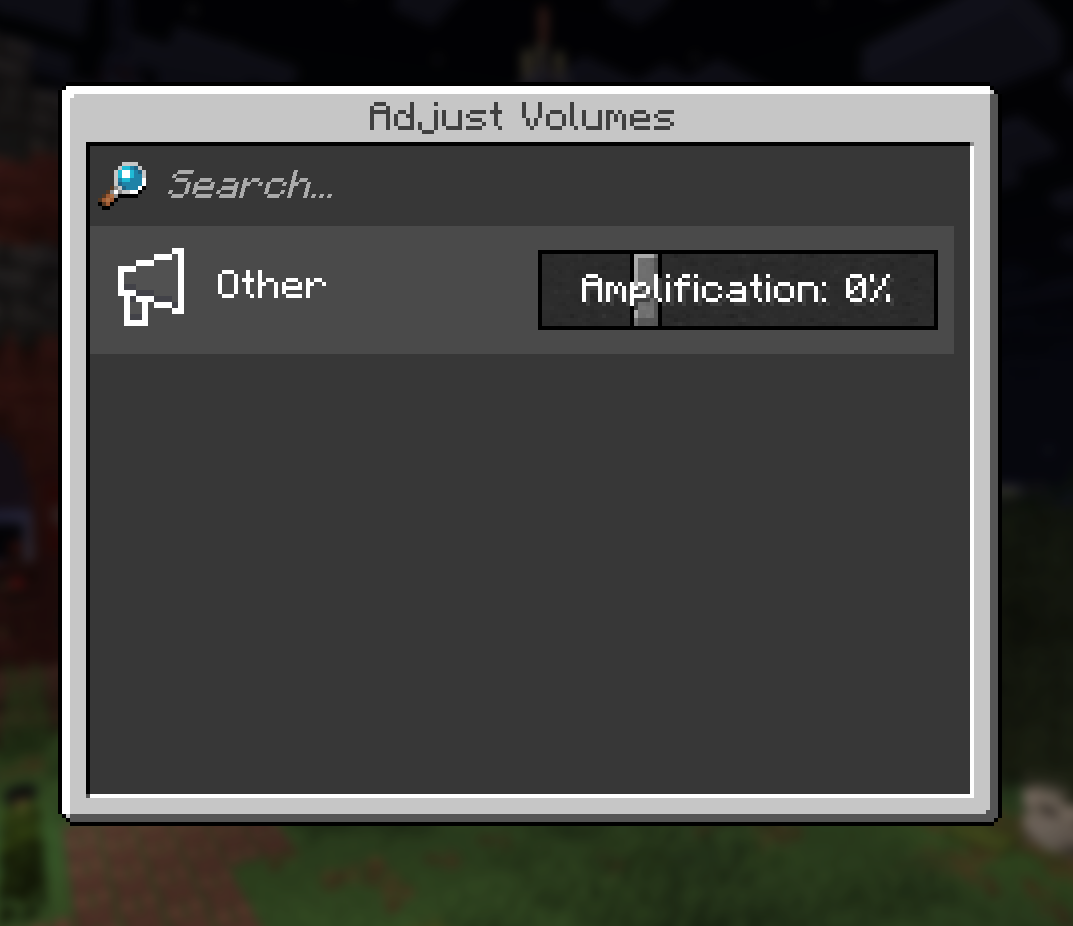
Adjusting Player Volumes
Open the main Voice Chat menu (V by default), then use the player-volume interface to fine-tune what you hear.
- Find a connected player in the list.
- Increase or decrease that player’s volume.
- Mute an individual player locally if you need a break from their audio.
- Restore a player’s volume when you want to hear them again.
- Watch for speaking indicators so you can tell who is currently talking.
Individual volume controls are local. Changing someone’s volume on your client does not change how other members hear that player.
Voice Groups
Voice groups (sometimes called group chats or teams in the Simple Voice Chat UI) are enabled on StoneHavenSMP. They provide private or separated communication that is not limited to normal proximity distance. Common uses include:
- Group expeditions
- Community projects
- Events
- Resource-gathering trips
- Players collaborating from different locations
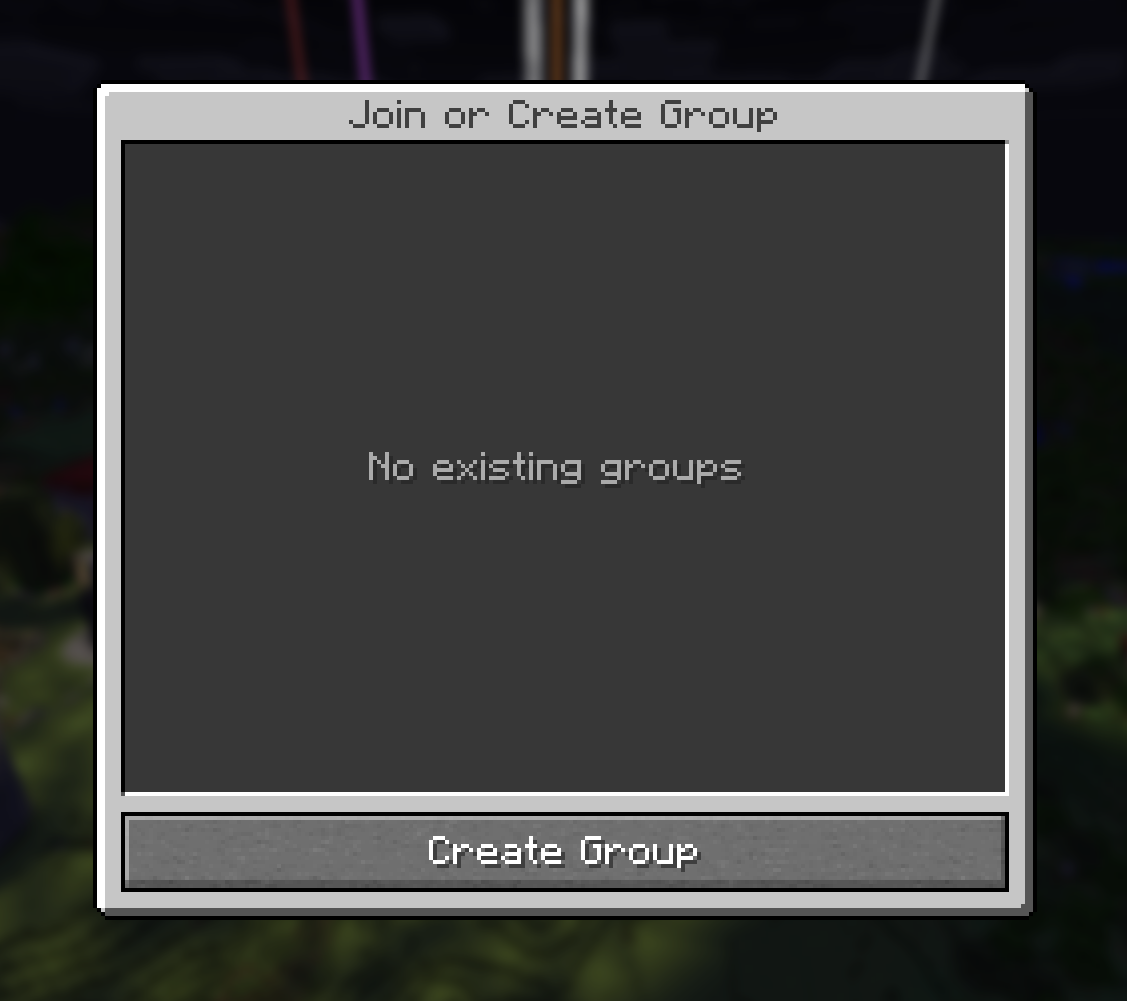
Creating and joining a group
- Open the Voice Group interface from the main Voice Chat menu’s Group button (or bind Group Chats in Controls if you prefer a key).
- Create a group.
- Choose the available privacy settings.
- Name the group.
- Add a password when the interface supports it and you want one.
- Invite another player, or have them join by name.
- Accept a group invitation if you receive one.
- Leave the group when you want to return fully to proximity chat.
Useful commands
/voicechat helpDisplays the available Simple Voice Chat commands.
/voicechat invite <player>Invites a player to the voice group you are currently in.
Example: /voicechat invite Steve
/voicechat join <group-name>Joins a voice group with the specified name when it can be uniquely identified.
Example: /voicechat join Mining Trip
/voicechat leaveLeaves your current voice group.
Audio and Interface Settings
Most of these options live on the Voice Chat Settings screen (main menu → Settings). You do not need to edit raw client configuration files for normal play.
- Master voice-chat volume — overall loudness of incoming voice audio
- Microphone selection — which input device transmits
- Speaker selection — which output device plays voices
- Microphone gain — how strongly your mic picks up speech (Auto or manual)
- Voice Activation threshold — how loud sound must be before Voice Activation transmits
- Microphone testing — confirm your input meter and test playback
- Noise suppression — reduce some background noise when available
- Three-dimensional audio — directional cues for where speakers are
- HUD icons — on-screen connection and status icons
- Player name-tag icons — voice status near other players’ names
- Group HUD position and size — where and how large the group overlay appears
- Audio output buffer — can reduce crackling on unstable connections, but may add a small amount of audio delay
Understanding Voice Chat Icons
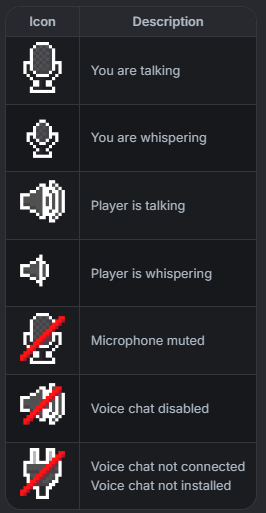
Simple Voice Chat shows HUD and player icons so you can see connection and speaking state at a glance. Official icon meanings include:
| Icon meaning | What it usually means |
|---|---|
| You are talking | Your microphone is transmitting |
| You are whispering | You are transmitting in whisper range |
| Player is talking | Another player is speaking nearby |
| Player is whispering | Another player is whispering |
| Microphone muted | You are not transmitting; you can still hear others |
| Voice chat disabled | Sending and receiving are both off |
| Voice chat not connected / not installed | Your client is not connected to voice chat, or the mod is missing |
Other useful states you may see in the interface:
- Voice group active — you are in a voice group
- Recording active — local recording is running on your client
- Connected — your client is connected to the server’s voice-chat service
Simple Voice Chat also offers black, white, and classic icon styles through Minecraft’s resource-pack settings.
Troubleshooting
Work through the matching symptom below. If several players lose voice chat at once, it may be server-side — Submit a Ticket(opens in a new tab) so staff can check.
Voice Chat Not Connected or Plug Icon
- Verify that the current StoneHavenSMP modpack is installed.
- Confirm that Simple Voice Chat is enabled.
- Restart Minecraft.
- Rejoin StoneHavenSMP.
- Temporarily disconnect from a VPN.
- Check whether voice chat works on another supported server.
- Ask other StoneHavenSMP members whether they are experiencing the same issue.
- Contact StoneHaven staff if several players are affected.
The server uses a separate UDP connection for voice chat. Players ordinarily do not need to configure port forwarding on their own routers.
Other Players Cannot Hear Me
- Make sure the microphone is not muted (
Mby default). - Confirm that Voice Chat has not been disabled (
Nby default). - Select the correct microphone.
- Enable microphone testing and speak normally.
- Adjust the Voice Activation threshold if you use that mode.
- Confirm operating-system microphone permissions.
- Restart Minecraft after changing audio devices.
- Try Push to Talk to determine whether Voice Activation is the problem.
I Cannot Hear Other Players
- Select the correct speaker or headset.
- Check the master voice-chat volume.
- Confirm that Voice Chat has not been disabled with
N. - Check individual player volumes.
- Make sure the player has not been muted locally.
- Reopen microphone testing or audio settings.
- Restart Minecraft after changing output devices.
Voice Is Choppy or Crackling
- Check the internet connection.
- Close bandwidth-heavy applications.
- Disconnect from a VPN.
- Increase the output buffer slightly.
- Reconnect to the server.
- Restart Minecraft.
Microphone Does Not Appear
- Confirm operating-system microphone access.
- Disconnect and reconnect the device.
- Restart Minecraft.
- Update audio drivers.
- Ensure another application is not exclusively controlling the device.
- On Linux installations using Snap, confirm that the launcher has microphone permission.
Bluetooth Audio Becomes Low Quality
Some Bluetooth headsets enter a lower-quality hands-free mode when using their microphone and speakers simultaneously.
- Use a wired headset
- Use a separate microphone
- Select a different output device
- Use the headset only for audio output
Proximity Does Not Work
You are most likely inside a voice group. Leave the group to restore normal proximity behavior.
For broader launch and join problems, see Troubleshooting and Known Issues.
macOS Microphone Permissions
macOS requires applications to receive explicit permission before accessing the microphone. Minecraft may not request this permission normally because the base game does not use a microphone.
- Prism Launcher is recommended by the Simple Voice Chat documentation for macOS.
- GDLauncher is also listed as supported.
- CurseForge users may need to configure CurseForge to launch Minecraft directly instead of opening the vanilla launcher.
For launcher-specific steps, follow the official macOS microphone permissions(opens in a new tab) guide rather than guessing from outdated forum posts.
StoneHavenSMP Voice Chat Guidelines
All StoneHaven community rules also apply to voice chat.
- Do not harass, threaten, discriminate against, or deliberately disrupt other members.
- Do not intentionally transmit loud music, soundboards, screaming, or excessive background noise.
- Respect members who choose not to speak.
- Never pressure someone to use a microphone.
- Do not pressure members to reveal their age, location, identity, or other personal information.
- Use Push to Talk or properly configure Voice Activation when playing in a noisy environment.
- Players may locally mute anyone they do not want to hear.
- Serious or repeated misconduct should still be reported to StoneHaven staff.
- Conversations are not automatically recorded by using voice chat.
- Client-side voice recording is allowed on StoneHavenSMP. If you record, make others aware that recording is happening and get their consent before you record.
Frequently Asked Questions
Do I need Discord to use Simple Voice Chat?
No. Simple Voice Chat operates directly inside Minecraft.
Do I need a microphone to join StoneHavenSMP?
No. Players can still play without speaking.
Can I listen without speaking?
Yes. Keep the microphone muted while continuing to hear nearby players.
Why do I see a plug icon?
The client is not connected to the server’s voice-chat service. Follow the connection troubleshooting steps.
Can every player hear me across the entire server?
Not during normal proximity chat. On StoneHavenSMP, normal voice reaches about 48 blocks, and whisper reaches about 24 blocks. Voice groups can allow communication across greater distances.
How do I mute myself?
Press M by default, or use the microphone control inside the Voice Chat menu.
How do I mute another player?
Open the player-volume interface and mute or lower that player locally.
Why can I hear someone far away?
You may be in the same voice group. Leave the group to return to proximity chat.
Does Simple Voice Chat work on Minecraft Bedrock Edition?
No. The official mod supports Minecraft Java Edition.
Does it support Lunar Client or Feather Client?
The Simple Voice Chat developers do not officially support custom clients such as Lunar or Feather. Members should use the official StoneHavenSMP Modrinth setup for the most reliable experience. See Installing the Modpack.
Are conversations recorded automatically?
No. Using voice chat does not mean StoneHaven automatically records every conversation. Client-side local recording is allowed, but you must make others aware and get consent before recording. Do not record people secretly.
Where can I get help?
Start with this guide and Troubleshooting. If you still need help, follow Submitting Logs, then Submit a Ticket(opens in a new tab) in Discord with your logs and screenshots.
Official Resources
Simple Voice Chat is created and maintained by Max Henkel and is not developed by StoneHavenSMP.
- Official overview(opens in a new tab)
- Client setup(opens in a new tab)
- Key bindings(opens in a new tab)
- Troubleshooting(opens in a new tab)
- Commands(opens in a new tab)
- macOS microphone permissions(opens in a new tab)
- Official Modrinth page(opens in a new tab)
Related StoneHavenSMP pages
- Gameplay Systems — other day-to-day systems on the server
- Wiki home — full StoneHavenSMP documentation index
- Installing the Modpack
- Community Rules
Related articles
Getting Started
Installing the Modpack
Install the Modrinth App and the shared StoneHavenSMP Fabric instance so your client matches the server.
Support
Troubleshooting
Fix common StoneHavenSMP launch, join, voice chat, and shader problems.
Rules and Policies
Community Rules
Core community expectations for StoneHavenSMP — respect, theft, griefing, consent PvP, and fair play.